Tuesday, December 25, 2012

Marinating A Christmas Tradition

Tradition!!
Of course all I ever think of when I hear that word is that hit tune from Fiddler on the Roof.  Once a musical theater nerd, always a musical theater nerd. Funny enough it's a perfect tie in, as this post touches upon Russian, Ukrainian, and Polish Christmas traditions. This year I wanted to to a full 12 course traditional Ukrainian meal, but with my travels it was impossible to do as I got home on Christmas Eve...eve. But I am already looking forward to next year when I can continue my Baba's legacy in the kitchen. 

Get easy access to basic recipes and read a little more about Sviaty Vechir here.  I love the part about how the meal commences when the children find the first star to light the sky on Christmas Eve. What a great tradition! I also love the idea of leaving a chair empty for those who have passed on.
Since I didn't have the time to prepare a feast, I will focus on the other very important aspect of any Slavic holiday...drinks!  
More specifically, Honey and Cherry Vodka.
My cousin has my Baba's secret recipe for her honey vodka, and I have yet to wrestle him for it, so I found this one online. ;) 

Prep Time: 20 minutes

Total Time: 20 minutes

Makes about 1 quart

Ingredients:

  • 2 tablespoons cold water
  • 2 cups sugar
  • 4 cups boiling water
  • 1/4 vanilla bean, split
  • 1/4 teaspoon nutmeg
  • 2 whole cloves
  • 1 small cinnamon stick, cracked in half
  • 10 black peppercorns
  • 20 allspice berries
  • 1 1/3 cups honey
  • Zest from 1 orange
  • 2 cups vodka

Preparation:

  1. In a large saucepan, combine cold water and sugar and heat until it dissolves. Add boiling water, vanilla bean, nutmeg, cloves, cinnamon stick, peppercorns and allspice. Bring to a boil, cover, reduce heat and simmer 5 minutes.
  2. Strain the simple syrup you've just created through cheesecloth or a coffee filter and return to the saucepan. Add the honey and zest, and heat, stirring, until the honey has completely dissolved. Bring to a boil and immediately remove from heat.
  3. Gradually stir in vodka. Serve hot. If serving, cold, let honeyed vodka come to room temperature, transfer to a lidded jar and refrigerate, covered, until ready to serve.
Honeyed vodka or Medivka, served hot or cold, is a favorite among Ukrainians and Poles. And, since it's steeped in aromatic spices, less than top-shelf vodka will do just fine. No matter what temperature it's served at, warms the body from the inside out. Perfect for the holidays! 

Two cousins made two different marinated sour cherry vodkas,
and we had a taste test to see which was the best. They were both quite different, but the basic recipe goes like this:
SOUR CHERRY VODKA
 
 Recipe By     : Homemade in the Kitchen
 Serving Size  : 1    Preparation Time :0:00
 Categories    : Beverages
 
   Amount  Measure       Ingredient -- Preparation Method
 --------  ------------  --------------------------------
    1 1/4  pounds        sour cherries, pitted (about 2 3/4 cups)
    1      cup           sugar
    2      cups          vodka
 
 Put the cherries into a 1-quart Mason jar, and cover with the sugar. Seal
 the jar and shake it several times, until the cherries are well coated with
 sugar. Add the vodka, reseal and shake the jar a few more times to mix. Set
 aside in a cool, dark place for 4 weeks. Strain the mixture through a fine
 sieve into a 4-cup glass measuring cup. If desired, transfer the liqueur to
 a decanter. The Sour Cherry Vodka should be ready to drink immediately and
 has a shelf life of 2 to 3 months.
 
 YIELD: 2 cups
  
I am sure one could substitute agave nectar or even honey to create a combined honey/cherry vodka as well!

 I love Christmas. I encourage everyone to look into their family history to build upon deep seated, interesting, and entertaining traditions. I had a great time with my mom, family, friends, and even had a very impromptu reunion with awesome cousins I hardly ever get a chance to see. The very best thing about the holidays, no matter what your religion or background, is spending time with those you love. 

Friday, December 14, 2012

Nobu on the Crystal Symphony


Silk Road is celebrity chef Nobu Matsuhisa's incredible specialty restaurant on the Crystal Symphony. I have spent many a wonderful evening here stuffing my face, all while convincing myself it's ok because it's mostly raw fish. So healthy! (six courses later....)
Silk road is based off of Nobu's cuisine from over 20 of his restaurants...and here is 


from all over the world. From New York to LA to Budapest and beyond, Nobu, with the help of Robert DiNiro, has created a sushi sensation.

Opening a restaurant in Melbourne with DiNiro
I highly recommend saving some money and blowing it all on a night to remember eating some of the most delicious Asian fusion... ever. Maybe you will run into some familiar faces:
...all coming and going at Nobu hot spots.

Some of my favorite dishes include the new style sashimi and Nobu box:
 I also enjoy the Rock Shrimp in a fabulous cream sauce that apparently is one of Scarlett Johansson's favorite dishes. 
So lucky to have had the opportunity to sample his cuisine over and over again....these are the perks of ship life that are the ones I really...savor. Pun intended.


Wednesday, December 5, 2012

Hawaiian Cuisine at the Shorebird

Take a good long look at that beautiful skewered shish kebab. Have you taken in it's juicy, stunning, stacked wonderment? A few of these babies along with the biggest buffet I have ever ingested in my life is what we found at the 
in beautiful Waikiki Beach, Honolulu, Hawaii. Waikiki restaurants are notorious for being supremely busy and after trying unsuccessfully to get onto wait lists for up to an hour, a woman randomly came up to us noticing our frustration, and pointed us in the direction of this perfect little restaurant. Thank you foodie angel.  All of the following was experienced right on the oceans edge, on the beach with a side of fireworks! Perfect night out.

From their webpage:

Here’s how it works
Steaks and seafood come to the table fresh on a platter. Guests are directed to the grill where they are provided with a variety of seasonings to completely customize the flavor of their entrees. Cooking times are clearly displayed at the grill along with a large clock to ensure perfection
All of our entrees include an expansive salad bar, which showcases more than 25 items, including fresh greens, garnishes, fruits, lomi lomi salmon, rice, bread, pasta and other local favorites. This is a meal in and of itself.
The buffet features items like our Hawaiian-style beef stew, home style chili, pasta, soup of the day, four-bean salad, fresh fruits, plus daily special entrees. 
Crazy blurry picture but that's what happens when you are being lit by tiki torches :)

Saturday, December 1, 2012

Cupcake Tours

Cupcakes are making a huge comeback and I for one am not disappointed. I'm still on the fence with neon day-glow and acid wash jeans, but cupcakes...yes please. Bring them back in "haute-couture-cuisine" style.

My gorgeous girl Kaleigh was in town and her request was to go on a cupcake tour. For some reason I complied very quickly. ;) She and I were a great team traveling in Europe together, and we both love photography, so capturing cupcakes in NYC seemed like the perfect activity for us.  Most people pay big bucks for these tours but I thought...why not come up with a cupcake tour of my own, tourist free... and...free.

 So here is a very easy cupcake walking tour in NYC's East Village. (all non stamped pictures courtesy of Kaleigh Jones)

We started in Union Square at Baked by Melissa.

After our tasting there, we walked to Crumbs Bake Shop...a bakery that is beyond overwhelming in their cupcake choices.

We walked through the beautiful Washington Square park displaying all it's beautiful fall colors. 
My turkey was so thirsty
No cupcake tour would be complete without a trip to one of the most famous bakeries in NYC, Magnolia Bakery.


But wait!!! You don't live in New York but you're now craving a cupcake? Or two or three or more? Here are cupcake tours across the country and across the pond. What a great idea for bachelorette parties, showers or well... if it's Thursday. ;) Get your cupcake on!

Click on the name of each city to take you to their tour:


Tuesday, November 20, 2012

Thanksgiving 2012

So excited. I have finally made my choices for Thanksgiving dinner.  I must give credit where it is due, and these were all recipes from Food Network star chefs, Sunny Anderson, Giada DiLaurentiis and the Barefoot Contessa. Food Network is amazing and their app allows you to bookmark your favorite recipes and cross off ingredients as you go along. Got to love it when grocery shopping gets simplified.
By Sunny Anderson we have 
By Giada DiLaurentiis a side of 
Penne With Butternut Squash and Goat Cheese (I will be making a gluten free version) 
 By Barefoot Contessa, 
French Apple Tart (not gluten free) for dessert.
I will start with longest to shortest prep and cook times.

Ingredients
  • 2 cups apple cider, plus 2 tablespoons
  • 1/4 cup salt, plus more for turkey
  • 3 to 5 sprigs thyme
  • 3 sprigs rosemary plus 1 teaspoon chopped
  • 1 (3 3/4-pound) boneless turkey breast with skin
  • 1/2 cup onion, finely chopped
  • 1 tablespoon olive oil, plus more for turkey
  • Freshly ground black pepper
  • 1 (10-ounce) bag frozen peeled and sliced peaches, chopped
  • 2 tablespoons honey
  • 1 teaspoon Worcestershire sauce
  • 1 tablespoon brown sugar
Directions
In a large bowl, whisk together 2 cups apple cider, salt, thyme and rosemary. Add turkey breast and enough water to cover the bird. Cover and let brine in the refrigerator 2 hours.
Preheat oven to 425 degrees F.
For the glaze:
In a small saucepan, saute onions in oil until softened. Add peaches, honey, Worcestershire sauce, brown sugar and remaining 2 tablespoons apple cider. Bring to a boil. Lower to a simmer and cook until peaches break down and glaze thickens, about 12 minutes.
Remove turkey from brine and pat dry with paper towels. Brush with oil and season with pepper. Place turkey in a roasting pan. Cook 15 minutes until skin begins to turn golden. Reduce the oven temperature to 350 degrees F and brush the top generously with the glaze. Continue cooking until an instant-read thermometer inserted in the thickest part of the breast reaches an internal temperature of 165 degrees F, about 45 minutes. Let the turkey rest at least 10 minutes. Its temperature will continue to rise.


Ingredients
  • Vegetable oil cooking spray
  • 1 (2-pound) butternut or kombucha squash, peeled, seeded and cut into 3/4-inch cubes
  • 1 onion, diced into 1/2-inch pieces
  • Olive oil, for drizzling
  • Kosher salt and freshly ground black pepper
  • 1 pound penne pasta (here I am using a gluten free penne)
  • 1 cup (8 ounces) goat cheese, crumbled
  • 1 cup coarsely chopped walnuts, toasted (see Cook's Note)
  • 1 packed cup chopped fresh basil leaves
  • 1/3 cup finely grated Parmesan
Directions
Put an oven rack in the upper third of the oven. Preheat the oven to 425 degrees F.
Spray a baking sheet, liberally, with vegetable oil cooking spray. Set aside.
Mix the squash and onion together and arrange in a single layer on the prepared baking sheet. Drizzle with olive oil and season with salt and pepper, to taste. Bake for to 40 to 45 minutes until the vegetables are golden and cooked through. Remove from the oven and set aside to cool slightly.
While the squash mixture is cooling, bring a large pot of salted water to a boil over high heat. Add the pasta and cook until tender but still firm to the bite, stirring occasionally, about 8 to 10 minutes. Drain and reserve about 2 cups of the pasta water. Put the pasta, goat cheese and 1 cup of pasta water in a large serving bowl. Toss until the cheese has melted and forms a creamy sauce. Add the squash and onion mixture, the walnuts and the basil. Toss well and season with salt and pepper, to taste. Garnish with Parmesan and serve.
Cook's Note:
To toast the walnuts, arrange them in a single layer on a baking sheet. Bake in a preheated 350 degree F oven until lightly toasted, about 6 to 8 minutes Cool completely before using.


Ingredients
For the pastry:
  • 2 cups all-purpose flour
  • 1/2 teaspoon kosher salt
  • 1 tablespoon sugar
  • 12 tablespoons (11/2 sticks) cold unsalted butter, diced
  • 1/2 cup ice water
For the apples:
  • 4 Granny Smith apples
  • 1/2 cup sugar
  • 4 tablespoons (1/2 stick) cold unsalted butter, small diced
  • 1/2 cup apricot jelly or warm sieved apricot jam
  • 2 tablespoons Calvados, rum, or water
Directions
For the pastry, place the flour, salt, and sugar in the bowl of a food processor fitted with the steel blade. Pulse for a few seconds to combine. Add the butter and pulse 10 to 12 times, until the butter is in small bits the size of peas. With the motor running, pour the ice water down the feed tube and pulse just until the dough starts to come together. Dump onto a floured board and knead quickly into a ball. Wrap in plastic and refrigerate for at least 1 hour.
Preheat the oven to 400 degrees F. Line a sheet pan with parchment paper.
Roll the dough slightly larger than 10 by 14-inches. Using a ruler and a small knife, trim the edges. Place the dough on the prepared sheet pan and refrigerate while you prepare the apples.
Peel the apples and cut them in half through the stem. Remove the stems and cores with a sharp knife and a melon baler. Slice the apples crosswise in 1/4-inch thick slices. Place overlapping slices of apples diagonally down the middle of the tart and continue making diagonal rows on both sides of the first row until the pastry is covered with apple slices. (I tend not to use the apple ends in order to make the arrangement beautiful.) Sprinkle with the full 1/2 cup of sugar and dot with the butter.
Bake for 45 minutes to 1 hour, until the pastry is browned and the edges of the apples start to brown. Rotate the pan once during cooking. If the pastry puffs up in one area, cut a little slit with a knife to let the air out. Don't worry! The apple juices will burn in the pan but the tart will be fine! When the tart's done, heat the apricot jelly together with the Calvados and brush the apples and the pastry completely with the jelly mixture. Loosen the tart with a metal spatula so it doesn't stick to the paper. Allow to cool and serve warm or at room temperature.

Happy Thanksgiving everyone!

Saturday, November 17, 2012

Razzed by Razza

Brick oven pizza has come to Jersey City in fine, fine form. 
Razza is a new vegetarian (without bragging about it) BOP restaurant down the street from us.

Kale Caesar Salad. 

What?? I am not a kale fan, but with the Caesar dressing, freshly grated Parmesan and home made croutons it was actually quite tasty.  Jason thought it might have been marinated in the dressing.  Hmmm...these are deep thoughts. I am definitely going to be trying this out at home. I need more ways to love this dark green magical veggie.

Pizza of the night? Pumpkin Pie Pizza. You had me at pumpkin pie. Pizza.
Ingredients: roasted garlic, butternut squash, mozzarella and basil. Heaven.
Sorry for the picture quality, and quantity of food. You can see my husband's eager fingers...half the pizza was gone before I got a chance to take a pic of it whole.  yum yum in my tum tum.

Friday, November 16, 2012

Papa's New Home-By Jessica Curtis

I am always incredibly impressed when I see my friends take matters into their own hands, think outside the box, and creating something from nothing. That's the definition of creativity right?   
The Webster definition is:
"The use of the imagination or original ideas, especially in the production of an artistic work."
Ooh that's pretty. Let's go with that.

Today's feature friend? Newly published author, Jessica Lynne Curtis.  Last spring we had the honor and pleasure of taking her photograph for the interior of the children's book she has written.  

The title of the book is "Papa's New Home", and it is a perfect story to give hope for a child experiencing the loss of a loved one. 

My friend, power blogger Kristy Glass, interviewed Jessica about the book, and the inspiration behind it.  Check out her post here.  I adored Papa's New Home. Whatever your faith is, the book's essence is purely about love, family and hope. 

As you can see I was quite moved, especially having recently gone through a loss myself.  My only complaint is that it was hard to read with tears welled up in my eyes!  So my advice is, if you purchase this book to help a child dealing with a loss, (which I strongly recommend you do) read it through so you can thoroughly experience the emotions you may have first!

You can purchase the book at Barnes and Noble or Amazon.

Thursday, November 15, 2012

From easy mac to easy wrap

I have been teased mercilessly for years by anyone and everyone who knew about my addiction to Easy Mac.  At the time I ate this delicacy with regularity I never worried about my weight.  It may have just been the metabolism of my early 20's, or what I like to call easy mac-tabolism.  Definition: the rejection of most food groups and the desire to make food preparation as easy or non-existent as possible so I could go back to working on that audition piece. 
The plus side of my metabolism is catching up with me, is that I am fully accepting... of rejecting....easy mac-tabolism.

So the other title of this post could be
"what to do with all those leftover veggies in the fridge?"
A bit wordy, so let's make it the sub-title. 
This post maybe a bit of a no-brainer, but in the past if I saw a bunch of leftover random veggies about to take their last breath in the fridge, they would pretty much get dumped. Well not now! Not with real metabolism setting in! and not when you have a couple tortillas laying around! 

Take the leftover veggies:

 Chop them all up and throw 'em down:
 Add some black beans for protein, and low fat feta for, well, just because it's delicious:
 and voila. The easy wrap. Veggie edition.
Just consider this option the next time you think, well it's not enough to really make...anything.
Just wrap it up! Done.

Monday, November 12, 2012

My Baba's Pyrohy!


This one is a little gem.  I happen to consider it to be one of the the greatest recipes on the planet but I might be slightly biased.  It makes my mouth water just thinking about it, so without further ado, here is Baba's secret recipe for perogies otherwise known as...pyrohy.

This is somewhat a toughie, so if you are new to cooking, I would start with the most important ingredient. Patience. You must also immediately lose your fear of making dough. If you are a seasoned chef you will find this pretty simple, and as long as you have some time to commit to refining your "pinching" skills.  You will love the result.
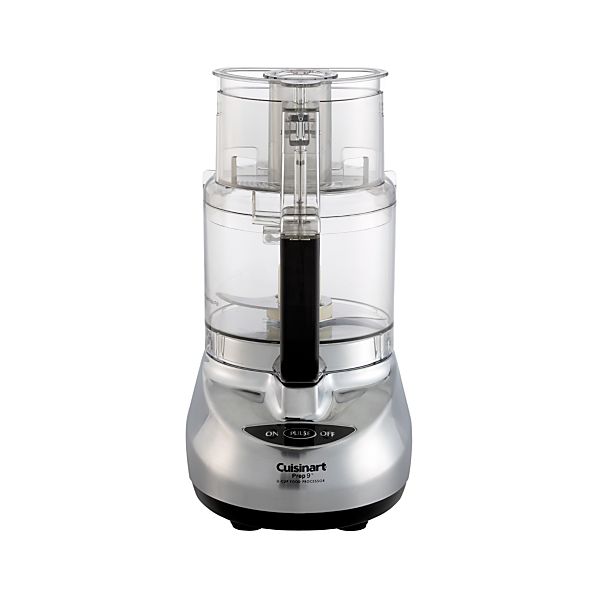
With a food processor such as this one, 

the entire experience is shortened and much less grueling. Because making dumplings is a long process I like to split the task into two days. It's convenient to make the filling one day while cooking a whole other meal, and then the next day you put the dumplings together, serve, and save. Depending how big you make them, this recipe should make approximately 50-60 pyrohy. It makes about six solid meals for the cost of...oh... $10.

Day One. 
Making the filling.

Ingredients for the filling:
 4 Large Potoatoes
1 Large Onion
1 package of farmer's cheese
Pepper

Peel and boil the potatoes, (15-20min-check softness with a fork) and mash. Saute one large onion and add to potatoes. Pepper to taste. Let potatos cool. Add the farmers cheese when cool and mash up everything very well. I have tried using a food processor here and I wouldn't not recommend it. The consistency needs not me tougher so this part takes a bit of elbow grease to make sure everything is nicely mixed with few lumps.

Day Two. 
Making the Dough and Assembling. Oh yeah and eating.

Ingredients for Dough:
3 Cups Flour
1 Egg
2 tablespoons Vegetable Oil
3/4 cup COLD water

 Put a large pot of water on the stove to boil. That was easy right? Ok now the complicated part...
Add all the ingredients into the food processor but the water. Make sure you are using the dough blade and dough setting. Add water slowly through the feeder until you have a beautiful ball of dough! Have plenty of flour spread out on a baking mat and on your hands because the dough will be sticky. Reach in and split the dough in two. Make sure you cover the processor with a wet cloth to keep the other half moist.  Roll the working dough out in one long dough "snake" and then cut the "snake" into 2inch pieces. Roll out each individual piece so you have little flat, round circles of dough. Take a melon baller and scoop individual balls of filling into each circle of dough. Fold the dough over and pinch in a half circle. Set aside and do it again to the next and the next and the next. When you have assembled about 10-15 of them, gently put them in the pot of water that should be at this point at a rolling boil for about 5 min. Remove, cool in a colander, add butter and repeat.
Repeat the entire assembling process with the second half of the dough and filling!

This video kills me. I love the Babas in this clip, and they are not messing around in a factory like setting. The main difference from my instructions and the video is that they roll out all the dough first and then cut circles with a cookie cutter. This is definitely another option, I have just felt like unless you work really quickly the dough dries more this way. They work quickly. ;)
My favorite part of this is when she says "No blowin your nose and then pinchin. We don't like that."


Now I just need to go find myself a "perogie-making" bonnet.
Please write to me with any questions you may have. Good luck and enjoy!!

Monday, November 5, 2012

Hurricane Sandy

We have been spared here in Jersey City, but the damage in my neighborhood is still extensive. One week later we still have no transportation into Manhattan. Sirens are still going off outside my window as I write this. We were unbelievably lucky to have had electricity for all but 36 hours of the whole experience. Puts it all in perspective, and I swear the once hardened Jerseyites are acting slightly softer. New Yorkers are tough and there isn't any tragedy we can't overcome. We pray for all of those who are still struggling and piecing their lives back together.

This little bridge connected us to Liberty State park. It has been blown off where it used to be attached right next to the sign. 
This webpage:
http://printaidnyc.com/posters/
is selling some beautiful posters and %100 of the proceeds go to Hurricane Sandy victims.
I love this one:
and this one:
And of course this one: